New VMware Skill, VMware Practitioner – NFV Operations, and you can get it for free!

A few days ago I saw a tweet from Eric Sloof about a new VMware Skill badge one could earn for free.

So I decided to go for it. Followed the also free online course VMware vCloud NFV Foundations with vCloud Director [V8.x]

And sat the VMware vCloud NFV with vCloud Director [V8.x] Test, I failed it the first time, you need to score at least 80%. But you do have 3 attempts, so the next day after reviewing my mistakes, I tried again, and I passed!

I must say the test is more trying than the course made me expect, the course doesn’t tell you allot, you need to have some knowledge of vCloud Director, vSAN, NSX and of course vSphere. Resource management and update/migration of (vCloud) infrastructures are very important topics in the tests I’ve done, however you will need solid knowledge of NSX and vSphere/vSAN! Allot of detail questions, the course focuses on NFV stuff that I really couldn’t match with the questions in the test. There is a module in the course outlining some basics about vSphere, NSX and vSAN, but not nearly detailed enough to pass the test.

For those of you who have done VTSP tests, this is much the same, it is using the same test engine, and you cannot go back to a previous question. With the score report, you will get a list of questions you got wrong, with your answers, but only those! There are some multi select questions which won’t tell you how many ‘right’ answers you need to pick from the list. So you won’t know if the question is wrong because of a wrong answer, or if it is due to many or to few selected options… Only that you didn’t receive it as 100% correct…

For some reason I wasn’t issued the badge, contacting VMware Education support didn’t really help, however they pointed me to Acclaim’s support, who seemed very willing to find out what went wrong. Today I finally received notice of the badge being issued.

vmware_Skill_Practitioner_NFV (1)


Daisy Chaining VMware UMDS

For a design question I was wondering if one could daisy chain multiple VMware Update Manager Download Service (UMDS) appliances. The documentation doesn’t say a word about it. The only thing I found Googling this was one blog that say’s it can’t be done. But that blog was from 2014, now, 2018, let’s see…

I started with a Ubuntu 16.04 LTS server and used William Lam’s script to install. It needed some more config:

(I tested this in Fusion virtual machines using vSphere 6.5 Update 1 (5969303)

Open the console of the first UMDS

sudo -i
mkdir /mnt/cdrom
mount /dev/cdrom /mnt/cdrom
apt-get install openssh-server -y
ifconfig

This gives the IP address (Ubuntu in Fusion creates ens33 interface)

Using an SSH (Windows: PuTTY / Mac: Termius) client, connect to the UMDS:

ssh vmninja@172.16.250.129

In the SSH session

sudo -i
wget https://github.com/lamw/vghetto-scripts/raw/master/shell/install_umds65.sh
chmod +x install_umds65.sh
./install_umds65.sh /mnt/cdrom/umds/VMware-UMDS-6.5.0-5939545.tar.gz UMDSDB UMDS_DSN umdsuser VMware1!
/usr/local/vmware-umds/bin/vmware-umds -v
/usr/local/vmware-umds/bin/vmware-umds -G
/usr/local/vmware-umds/bin/vmware-umds -S --add-url https://vibsdepot.hpe.com/index.xml --enable-host --url-type HOST
/usr/local/vmware-umds/bin/vmware-umds -D
(In the example above I’ve added the HPE VibsDepot, to see if non-firstparty updates will get downloaded.
It will now start downloading… It takes some time, at the time of writing it was about 65 GB
Per William’s suggestion for the test I used Pythons buildin webserver:
apt-get install python-minimal -y
cd /var/lib/vmware-umds
python -m SimpleHTTPServer 80
Using this as a foreground task, it shows all HTTP requests being received:
172.16.250.150 - - [18/Feb/2018 05:28:19] "GET /hostupdate/HPQ/metadata-hpnmi-vmware55-bundle-2.3-6.zip HTTP/1.1" 200 -
172.16.250.150 - - [18/Feb/2018 05:28:19] "GET /hostupdate/csco/__hostupdate20-consolidated-metadata-index__.xml HTTP/1.1" 200 -
172.16.250.150 - - [18/Feb/2018 05:28:19] "GET /hostupdate/csco/csco-VEM-5.5.0-metadata.zip HTTP/1.1" 200 -
172.16.250.150 - - [18/Feb/2018 05:28:19] "GET /hostupdate/vmw/__hostupdate20-consolidated-metadata-index__.xml HTTP/1.1" 200 -
172.16.250.150 - - [18/Feb/2018 05:28:19] "GET /hostupdate/vmw/vmw-ESXi-5.5.0-metadata.zip HTTP/1.1" 200 -
172.16.250.150 - - [18/Feb/2018 05:28:19] "GET /hostupdate/vmw/vmw-ESXi-6.0.0-metadata.zip HTTP/1.1" 200 -
172.16.250.150 - - [18/Feb/2018 05:28:20] "GET /hostupdate/vmw/vmw-ESXi-6.5.0-metadata.zip HTTP/1.1" 200 -
172.16.250.150 - - [18/Feb/2018 05:28:20] "GET /vaupgrade/bootstrap_index.xml HTTP/1.1" 200 -
172.16.250.150 - - [18/Feb/2018 05:28:20] "GET /vaupgrade/__valm-consolidated-index__.xml HTTP/1.1" 200 -

But first I needed to build a second UMDS, mostly the same as above, but:

  1. I didn’t add the HPE VibsDepot
  2. I pointed hostupdate.vmware.com and vapp-updates.vmware.com to localhost, by editing the /etc/hosts file to prevent it to try to download anything directly from VMware.com’s website.
    • For some reason it is not possible to remove these entries from UMDS’s config, or to remove the older versions… I don’t need updates for any ESXi prior to 6.5….
    vmninja@ubuntu:~$ cat /etc/hosts
    127.0.0.1       localhost
    127.0.1.1       ubuntu
    127.0.0.1       hostupdate.vmware.com
    127.0.0.1       vapp-updates.vmware.com
    
    # The following lines are desirable for IPv6 capable hosts
    ::1     localhost ip6-localhost ip6-loopback
    ff02::1 ip6-allnodes
    ff02::2 ip6-allrouters
  3. Instead of the HPE VibsDepot, I added the first UMDB as source:
    /usr/local/vmware-umds/bin/vmware-umds -S --add-url http://172.16.250.129/hostupdate/__hostupdate20-consolidated-index__.xml --enable-host --url-type HOST
    /usr/local/vmware-umds/bin/vmware-umds -S --add-url http://172.16.250.129/vaupgrade/__valm-consolidated-index__.xml --enable-va --url-type VA
  4. Start the download task:

    /usr/local/vmware-umds/bin/vmware-umds -D

After downloading was complete, I added the second UMDS to vCenter Update Manager:

UpdateManagerConfig

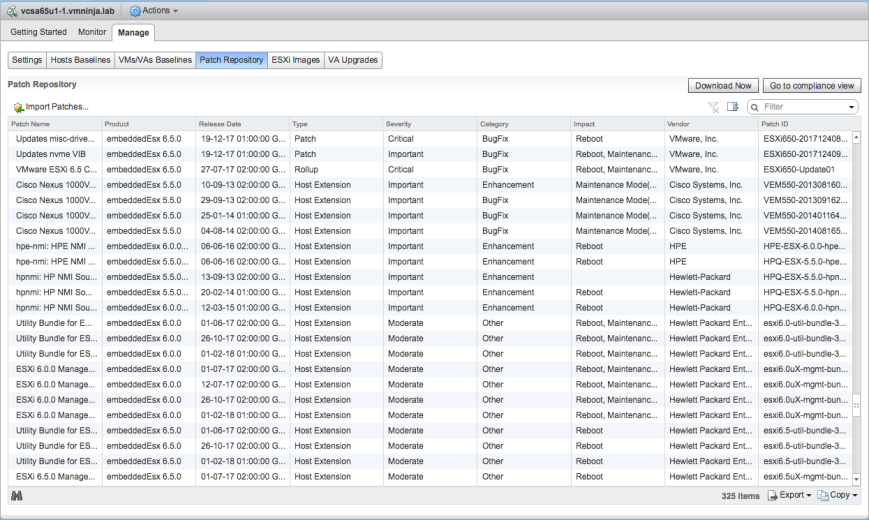
After clicking download now, the Non VMware Patches are visible in vCenter:

PatchRepository

So it seams to be possible to daisy chain UMDS. I have no idea about the supportability of this configuration, and if using something in production, use a real webserver!

How to reinstall VMware Tools on a ParaVirtual VM

At a customer location I was asked to reinstall VMware Tools on machines, normally the customer would do this their selves, but after uninstall of the VMware Tools, the VM wouldn’t boot. They needed to reinstall the VMware Tools because of the issue encountered described in  VMware KB2063887

The issue is quite simple, it’s a chicken-egg kind of thing. VMware Tools includes the device driver for the PVSCSI Controller, without VMware Tools, Windows lost its driver for the PVSCSI controller and can’t boot from it.

So I created this how to for the customer, and thought it might be useful for others.

So what’s the trick. Actually if you ever changed a VM to use the ParaVirtual SCSI Controller, you boot the VM using it’s ‘normal’ SCSI controller, you add the PVSCSI and a (temporary) hard disk to it, wait for Windows to install all drivers and ‘see’ the hard disk connected to the PVSCSI. You then shutdown Windows, remove any temporary hard disk, remove the extra PVSCSI controller and change the type of the original controller to PVSCSI.  This is mostly doing the opposite:

This is done on Windows Server 2012R2, the process should be much the same on other versions.

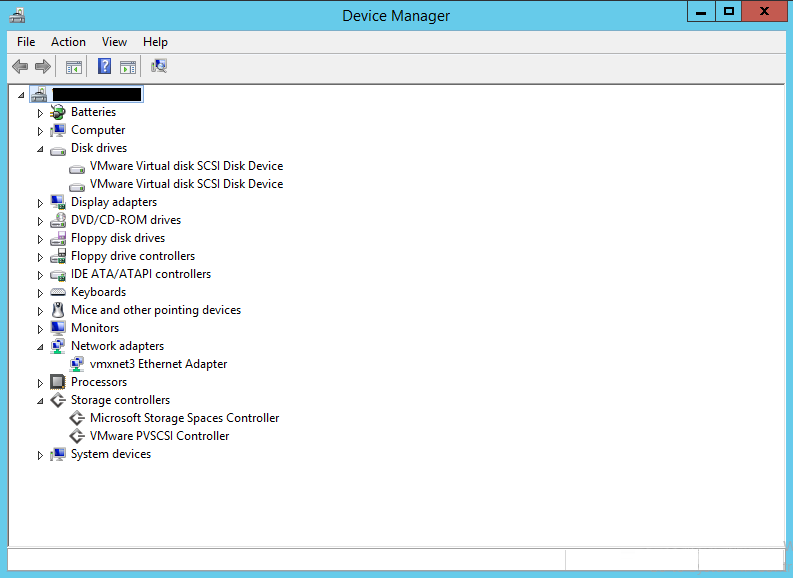
20171018_001

Device Manager showing VMware hardware devices in default view.

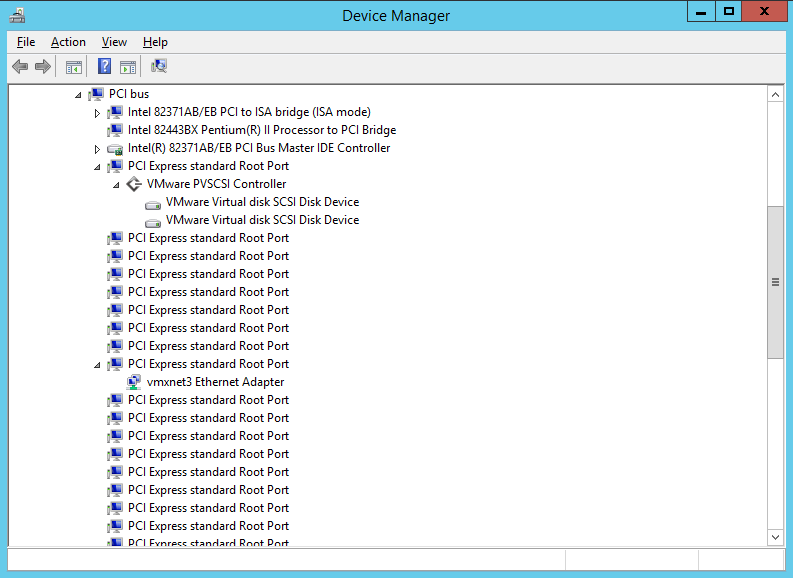
20171018_002

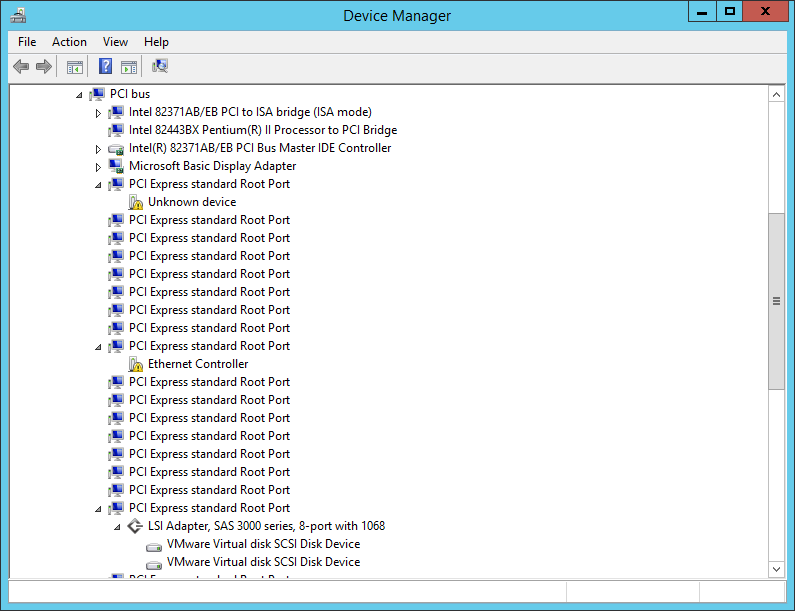
Device Manager showing VMware hardware devices in Device by connection view.

  1. Add Temporary Hardware
    1. While the Virtual Machine is running, using the vSphere Client, select the Virtual Machine and open Edit Settings…20171018_003
    2. From the Pull-Down Menu New Device, select SCSI Controller
    3. Click Add, a new LSI Logic SAS Controller will be added.
    4. From the Pull-Down Menu New Device, select New Hard Disk
    5. Click Add, a new 40 GB Hard Disk will be added.
    6. 20171018_004

    7. From the Virtual Device Node Pull-Down Menu select New SCSI controller
    8. (Optional) Adjust the size of the new Hard Disk from 40 GB to 1 GB
    9. (Optional) From the Disk Provisioning Pull-Down Menu select Thin provision
    10. Click OK
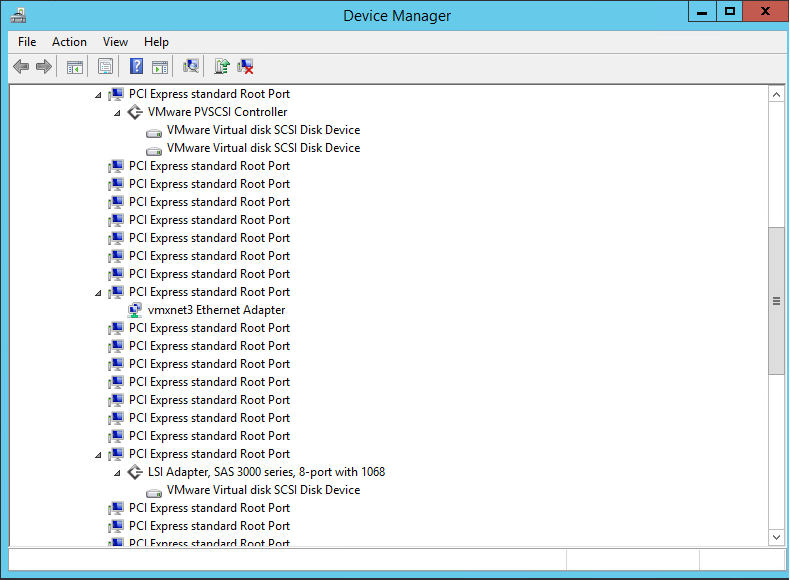
    11. Almost instantaneous the added hardware is visible in Windows:

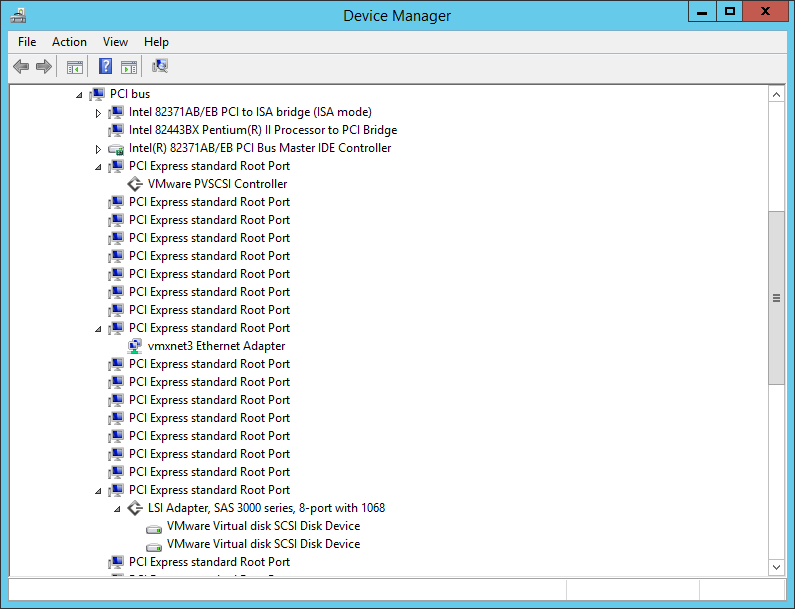
      20171018_005

      Device Manager showing the newly added LSI Adapter, SAS 3000 series, 8-port with 1068 SCSI controller and the added VMware Virtual disk SCSI Disk Device hard disk connected to it. The original two disks are still connected to the VMware PVSCSI Controller

      20171018_006

      Disk Manager showing the added Hard Disk. It does not have to be partitioned or formatted.

  2. Reboot
    1. Reboot the Virtual Machine.
    2. When the Virtual Machine starts, Windows will commit some changes to the device drivers.
    3. 20171018_008

      Windows is installing drivers for the added hard disk.

      When you are quick enough you might see the Plug and Play Device Setup running installing the hardware. (On my example server it took only a few seconds to install.)

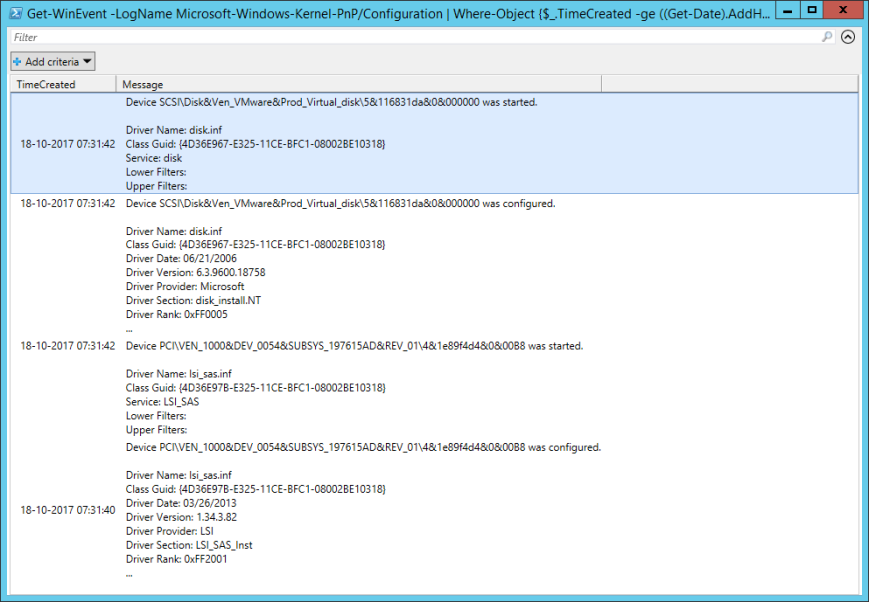
      For those interested, the Kernel-PnP log shows what happened:

      20171018_009

      GridView showing Kernel Plug & Play events created by the following PowerShell command:

      Get-WinEvent -LogName Microsoft-Windows-Kernel-PnP/Configuration |
      Where-Object { $_.TimeCreated -ge ( (Get-Date).AddHours(-1) ) } |
      Select-Object TimeCreated,Message | Out-GridView
      
    4. Shut down the Virtual Machine
    5. TL;DR
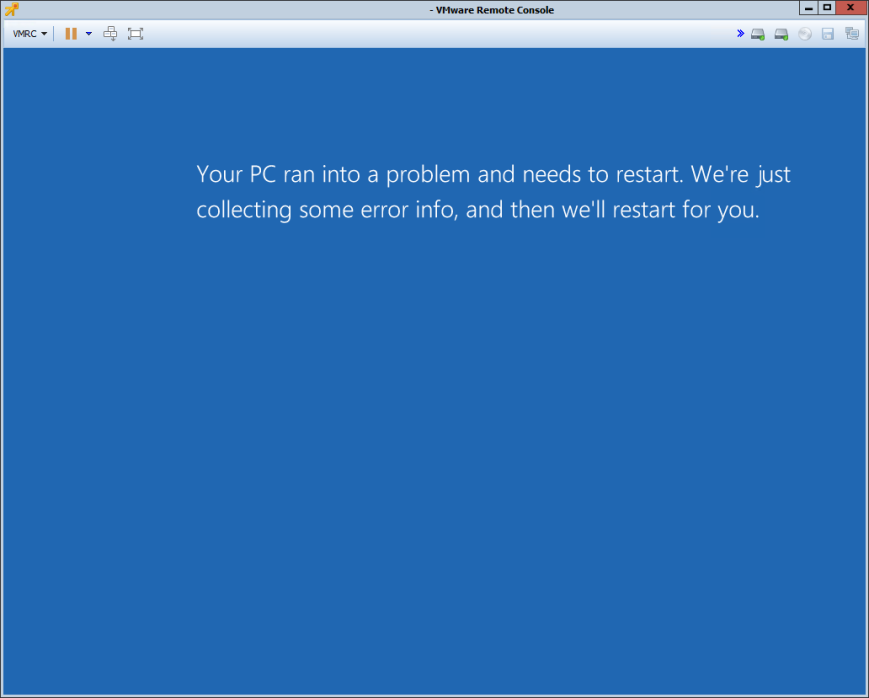
    6. Important: If you should skip the reboot step and just shut down the Virtual Machine and start modifying the Virtual Hard Disk Configuration, you’ll be presented with a BSoD boot loop. “Your PC ran into a problem and needs to restart. We’re just collecting some error info, and then we’ll restart for you.”
      20171018_010

  3. Modify Virtual Hard Disk Configuration
    1. While the Virtual Machine is shut down, using the vSphere Client, select the Virtual Machine and open Edit Settings…
    2. In my example the Virtual Machine started with 2 original Hard Disks before the third one was added. Since only the first two disks are showed, to remove the third Hard Disk first we need to click on Manage other disks.
    3. In the Pop-Up window, hover above line Hard disk 3, and a gray icon with a white X is shown. Click this icon.
    4. The line changes and shows a checkbox Delete files from datastore. As long as you are sure that you are removing the newly added disk, check the checkbox.
    5. 20171018_011

    6. Click Close
    7. Back in the Edit Settings window, click OK
    8. Important: Only after closing Edit Settings with OK, the changes will be applied. If not applied the following steps cannot continue.

    9. Open Edit Settings
    10. Click the little triangle shaped toggle in front of each Hard disk to open the advanced settings.
    11. From the Virtual Device Node Pull-Down Menu select SCSI controller 1
    12. Important: The Logical Unit Number should stay the same, only the adapter number may change:

      • SCSI(0:0) must become SCSI(1:0).
      • SCSI(0:1) must become SCSI(1:1).
      • Etc.
    13. Click OK
    14. Start the Virtual Machine.
    15. Check if all disks are only connected to the LSI Adapter using Device Manager:
    16. 20171018_012

  4. Remove VMware Tools
    1. Click Start -> Control Panel -> Program and Features
    2. Select VMware Tools and click Uninstall.
    3. Click Yes
      20171018_013
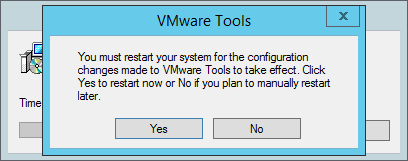
    4. When the Uninstall is finished, reboot the Virtual Machine20171018_014
    5.  When the Virtual Machine is restarted, the Device Drivers for the VMware Paravirtual devices are missing (Unknown devices):

      20171018_015

  5. Install VMware Tools
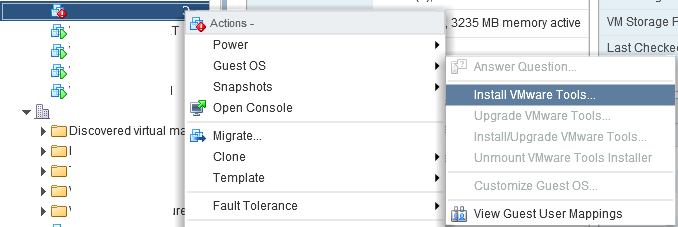
    1. While the Virtual Machine is running, using the vSphere Client, select the Virtual Machine and click Guest OS -> Install VMware Tools…
    2. 20171018_016

    3. If the VMware Tools Setup is not started automatically, click Choose what to do with this disc Pop-Up.
    4. Click Run setup64.exe
    5. 20171018_017

    6. Install the VMware Tools using all defaults, unless you have a reason to change them.
    7. Click Next >, Next >, Install, Finish
    8. 20171018_018

    9. After the installation is finished, reboot the Virtual Machine
    10. 20171018_019

    11. After the reboot, shut down the Virtual Machine
  6. Reconfigure Virtual Hardware (Change back to Paravirtual SCSI Controller)
    1. While the Virtual Machine is shut down, using the vSphere Client, select the Virtual Machine and open Edit Settings…
    2. Click the little triangle shaped toggle in front of each Hard disk to open the advanced settings.
    3. From the Virtual Device Node Pull-Down Menu select SCSI controller 0
    4. Important: The Logical Unit Number should stay the same, only the adapter number may change:

      • SCSI(1:0) must become SCSI(0:0).
      • SCSI(1:1) must become SCSI(0:1).
      • Etc.

      20171018_020

    5. Click OK
    6. Important: Only after closing Edit Settings with OK, the changes will be applied. If not applied the following steps cannot continue.
    7. Open Edit Settings
    8. Hover above line SCSI Controller 1 LSI Logic SAS, and a gray icon with a white X is shown. Click this icon.
    9. 20171018_021

    10. The line changes and shows Device will be removed.
    11. 20171018_022

    12. Click OK
    13. Start the Virtual Machine. 

VMworld Certifications

Each year at VMworld there are 50% discounts on exams. And since my VCP DCV 6.0 certification was about to expire… End of May the news came that I failed the 6.5 beta exam in januari, so needed to sit the exam again. But at least the results came quicker than the results of the 6.0 beta exam, which took almost 8 and a half months to get.)

So with the discount I decided to retry the exam at VMworld. I figured monday (Partner day) would be a good time to take it, so I scheduled the exam at 11:00. I wasn’t the only one who figured this, and the examroom was full. Which actually was a blessing, but more on that later.

My VCP 6.5 (2V0-622) experience.

vmware_professional6-5_dcv

The exam consisted of 70 multiple choice questions. You have the ability to go back to any previous question. Which can be helpful sometimes the answer of a question is given in another question so going back and forth gives you an advantage. There is no calculator available, and some questions require some calculus. Don’t worry too much, the questions I got were quite easy to solve with the use of the pen and paper. But I can imagine that when one is very nervous, this may add to the pressure.

Next to this, the number of typo’s, especially the lack of spaces was really bad. This is something that shouldn’t happen. Simply because one could loose points if a question is regarding an exact command line command, and the spaces, or lack there of, will invalidate the command on the commandline itself. So if one is too critical the correct answer is not listed… However in most cases choosing the most likely should be ok. I got 450 point out of 500, so approx 90% correct. (I know the scoring is calculated by a bunch of witches flying on broomsticks and it involves in which house the moon and Mars are present.) but it worked for me.

You are able to comment on each question. I’ve done so for a few.

Blessing in disguise

I promised to get back to the blessing in disguise of the full exam room. It allowed me the time to talk to other people waiting for their spot. I ended up talking to @eelkehagen who was waiting for his chance on the 2VB-601 (vSAN Specialist 2017) exam. His enthousiasme and the fact that when you take the exam at VMworld you get a free t-shirt made me want to do the exam as wel.

img_3131-220x165

(image courtesy of VMware)

So I decided to read the Exam Preparation Guide and it contains 10 mock questions which I tried and scored over 70% correct. At VMworld the new vSAN 6.6 Hands on Labs were available so I sat the HOL-1808 and just went for it. The worst that could happen is that I failed the exam, so why not…

My vSAN Specialist 2017 (2VB-601) experience.

vmware_specialist_vsan2017

This exam is like any other, 60 multiple choice questions. You are able to go back and forth between questions, again no calculator available, but also no comment option. I never sat a VMware exam before that didn’t include the comment option. Maybe something went wrong, maybe it just doesn’t include the feature.

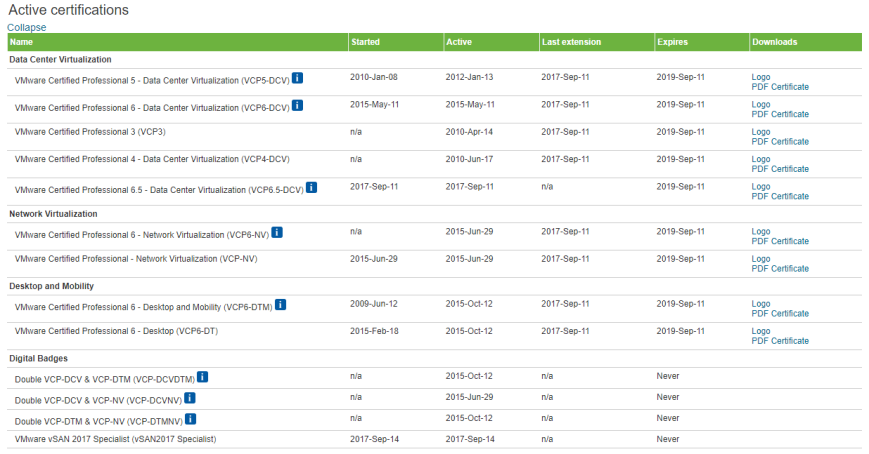
The exam doesn’t extend the validity of the VCP status, however it does not expire, and doesn’t feature an certifcate, only the badge. (Avaliable thru youracclaim.com)CertStatus

However the exam is quite doable when you have:

I actually never used vSAN in an production environment, only in my homelab and HoL.

I had one question in the exam that reverencing a product of a third party, which a had to guess since I never heard of the product mentioned. There were quite a few questions about designs if they are valid or not. So having a good idea about all the configuration maximums is a must. Anyways: I received my T-shirt!

djsiwedxgaaqh5f

Me and Peter van de Bree (@PvdBree) showing off my T-Shirt @VMware Education booth


Homelab upgrade to 10 Gbps for less than $1000 /

I’ve finally installed my new Layer 3 10Gbps switch. An Ubiquiti EdgeSwitch 16-XG. This switch with 12 SFP+ ports and 4 RJ45 ports and is capable of Layer 3 routing. This device is available around 550 – 600 euro (roughly 650-700 US dollar)

es16xg


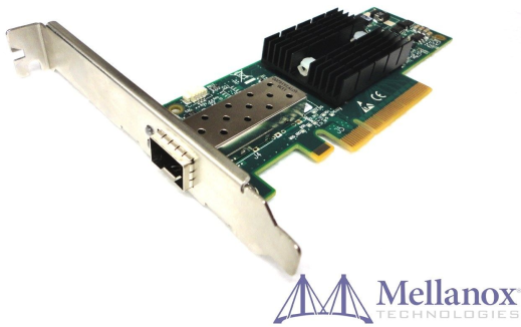
I bought some second hand Mellanox  ConnectX-2 10Gbps SFP+ cards on Ebay for around   $20 each and also found Cisco H10GB CU3M 3meter Twinax SFP+ cables costing around $7 a pop on there as well.

So what does this bring, firstly the Mellanox cards are listed as compatible with ESXi 6.5 GA and U1 so after installation, they got recognized instantly.

After configuring a VMkernel port on it to test a vMotion from a single SATA SSD from Host01 to the same SSD in Host02 I saw this troughput:

WhatsApp Image 2017-08-29 at 08.16.00

It’s maxing out at 249 Megabyte per second transfer speed.

Mind you this is done with Intel Avoton servers, and some Kingston SSDNow V300 SV300S37A/60G SSDs. I was impressed!

And as an added benifit I could say goodbye to my trusty old Vyatta VM acting as router. The Ubiquiti switch is doing the routing now.

Few remarks: The switch can out of the box only be managed using the webbrowser to its default IP address (192.168.1.2) even the console port is disabled out of the box. But since there is no console cable included it only bothers those idiots that have Cisco DB9-RJ45 console cables laying around…

But if you are accustomed to Cisco CLI, the CLI is compatible. No webadmin, CLI FTW.

I’ve broken the LACP LAG between my two Zyxel GS1910-24 switches, and connected each to the Ubiquiti using LC-LC Fiber and 1GBps SFPs. I’m geeking out with this new setup!

zyxel-gs1910-24

When I get the time I’m gonna try to setup LACP LAG between the Ubiquiti and each of the Zyxels to get 2 GBps of uplink bandwidth to the Zyxel switches, and maybe do some cable management 🙂

BadCabling

I know, it should be much neater, but to be perfectly honest I didn’t even got to bolt down the Ubiquiti (this is an older picture, before I got the Ubiquiti.)


Ubuntu 14.04 x64 UEFI V2V Hyper-V – vSphere

Using VMware Converter to do some cold clone V2V didn’t lead to a working VM. After conversion the VM Type was set to Other (32-bit) which lead to a non booting VM, not even from .iso.

NonBootUEFI32bit

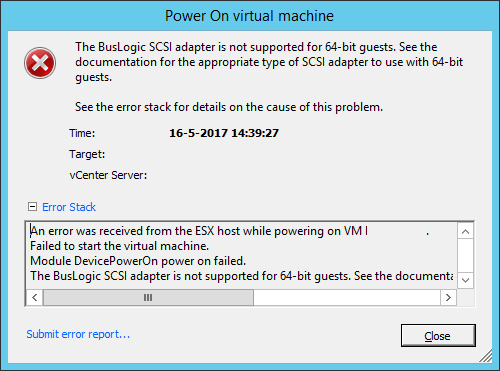
Changing it to ‘Ubuntu Linux (64-bit)’ would make it boot from CD, however, Converter had build the VM with BusLogic Parallel SCSI, and a 64-bit guest will not poweron with this adapter:

Buslogic

An error was received from the ESX host while powering on VM .
Failed to start the virtual machine.
Module DevicePowerOn power on failed.
The BusLogic SCSI adapter is not supported for 64-bit guests. See the documentation for the appropriate type of SCSI adapter to use with 64-bit guests.

Changing it to LSI Logic Parallel made this error go away.

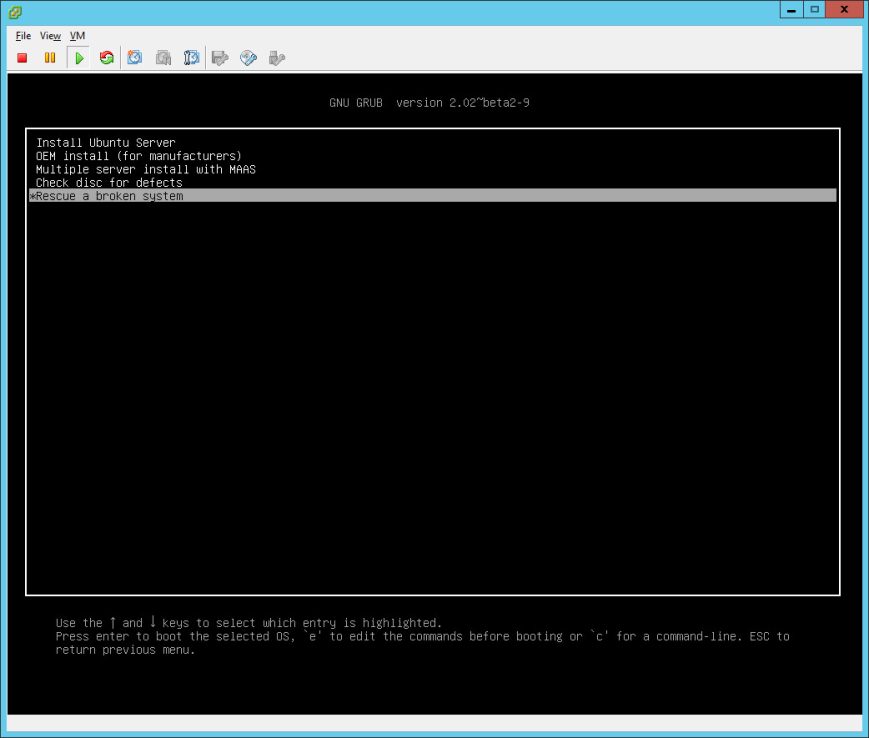
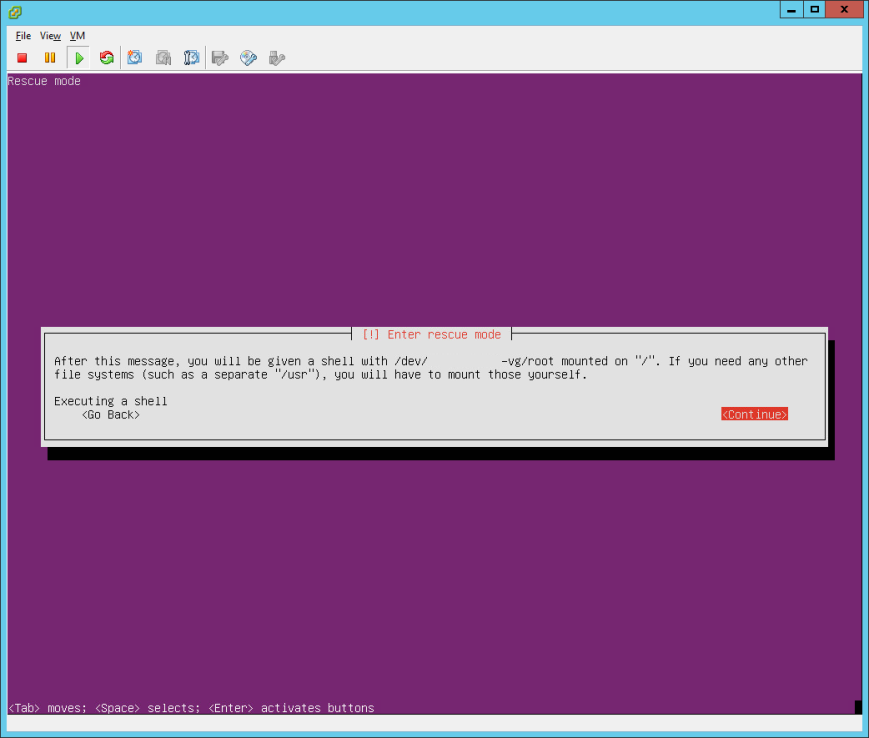
Now we can boot, but only from CD. Using the Ubuntu install DVD .iso boot into Rescue Mode:

bootcd

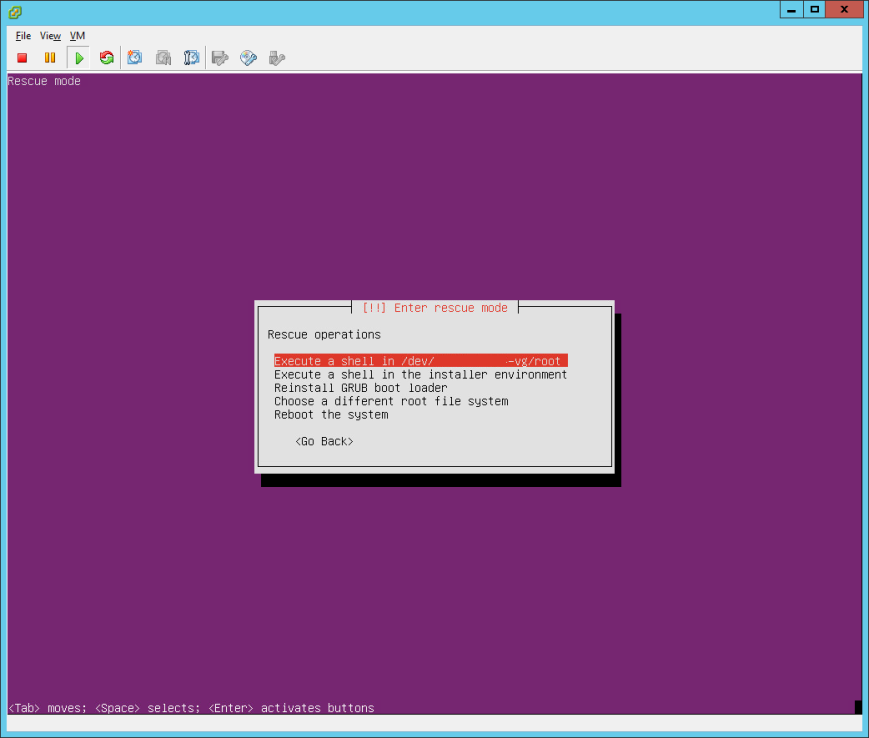
Just enter thru each of the screens until it asks for the file system to use as root file system:

selectpartition

Select to one called /dev/-vg/root

bootpart

Yes we need /boot to be mounted

startshell

Now start a shell in /dev/-vg/root

confirm

In the shell type:

mount /dev/sda1 /boot/efi
grub-install --target=x86_64-efi --efi-directory=/boot/efi
exit

When returned to the Purple Rescue Mode menu, choose Reboot system.


V2V RHEV to vSphere

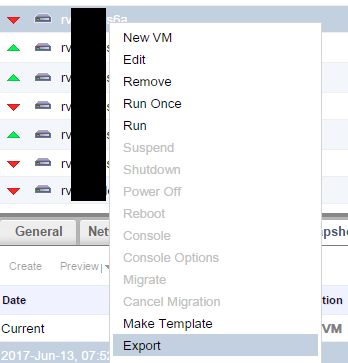
To convert a virtualmachine from Red Hat Enterprise Virtualization (RHEV) 3.4.1 to vSphere you can just export the VM to a (must already be assigned) Export volume.

rhev-export

This volume was exported thru NFS so it could be reached from an ESXi server.

However the files created by this export are not consumable by vSphere 6.5:

someGUID                   (GUID of the RHEV Domain)
 |-dom_md
 |-images
 | |-someGUID              (Contains 1 disk + descriptorfile)
 | |-someOtherGUID         (Contains 1 disk + descriptorfile)
 |-master
   |-tasks
   |-vms              
     |- VirtualMachineGUID (Contains .ovf file)

The disk files have no extension, and are accompanied by a .meta file.

Meta file looks something like:

DOMAIN=a1b2c3d4-e5f6-g7h8-1a2b-3c4d5e6f7g8h
VOLTYPE=LEAF
CTIME=1497337066
FORMAT=COW
IMAGE=aaaabbbb-aabb-ccdd-eeff-gghh11223344
DISKTYPE=2
PUUID=00000000-0000-0000-0000-000000000000
LEGALITY=LEGAL
MTIME=1497337138
POOL_UUID=
SIZE=104857600
TYPE=SPARSE
DESCRIPTION=
EOF

This doesn’t give a nice pointer to the diskname luckely the .ovf does:

<Section xsi:type="ovf:DiskSection_Type">
   <Info>List of Virtual Disks</Info> 
   <Disk ovf:size="60" 
         ovf:wipe-after-delete="false"
         ovf:disk-alias="myvm_Disk2"
         ovf:boot="false"
         ovf:disk-interface="VirtIO"
         ovf:volume-type="Preallocated"
         ovf:volume-format="RAW"
         ovf:format="http://www.vmware.com/specifications/vmdk.html#sparse"
         ovf:fileRef="ed4a3bd4-3e69-4cb0-b47d-b099aa867523/3a06f6ac-1879-4419-b23c-ad6f375b80d5"
         ovf:parentRef=""
         ovf:vm_snapshot_id="b7976804-3839-4d72-aa07-15fa6dccd4d7"
         ovf:actual_size="60"
         ovf:diskId="3a04e63c-1879-4419-b23c-ad6f2aeb80d5"/>
   <Disk ovf:size="40" 
         ovf:wipe-after-delete="true"
         ovf:disk-alias="myvm_Disk1"
         ovf:boot="true"
         ovf:disk-interface="VirtIO"
         ovf:volume-type="Preallocated"
         ovf:volume-format="RAW"
         ovf:format="http://www.vmware.com/specifications/vmdk.html#sparse"
         ovf:fileRef="f2c52dda-a1b1-44e7-8d9e-5216c234a3a6/c86e7cda-fd38-4b83-80cc-26de0fc81871"
         ovf:parentRef=""
         ovf:vm_snapshot_id="b7909804-3839-4d72-aa07-15ff6dccd4d7"
         ovf:actual_size="40"
         ovf:diskId="c86e7cda-fd38-4b83-80cc-26de0fc81871"/>
   <Disk ovf:size="60" ovf:wipe-after-delete="false" 
         ovf:disk-alias="myvm_Disk3"
         ovf:boot="false"
         ovf:disk-interface="VirtIO"
         ovf:volume-type="Preallocated"
         ovf:volume-format="RAW"
         ovf:format="http://www.vmware.com/specifications/vmdk.html#sparse"
         ovf:fileRef="d605aa54-5672-4a9d-ba61-fddb66427445/b4ea338d-aadd-4b15-83b3-67b74272d5a8"
         ovf:parentRef="" 
         ovf:vm_snapshot_id="b7a09804-3839-4d7a-aa07-15ffadccd4d7"
         ovf:actual_size="60" 
         ovf:diskId="b4e0a38d-aada-4b15-83a3-67b7427ad5a8"/>
</Section>

So this gives the relation between a GUID (both directory and filename) and the disk number. All thats needed is the information form the ovf:disk-alias and ovf:fileRef tags.

Under RHEVDomainGUID/images/
myvm_Disk1: f2c52dda-a1b1-44e7-8d9e-5216c234a3a6/c86e7cda-fd38-4b83-80cc-26de0fc81871
myvm_Disk2: ed4a3bd4-3e69-4cb0-b47d-b099aa867523/3a06f6ac-1879-4419-b23c-ad6f375b80d5
myvm_Disk3: d605aa54-5672-4a9d-ba61-fddb66427445/b4ea338d-aadd-4b15-83b3-67b74272d5a8

Now the filenames are known the conversion can be done.

To convert these files to .vmdk files I used the qemu-img tool with the following commandline:

qemu-img convert ./f2c52dda-a1b1-44e7-8d9e-5216c234a3a6/c86e7cda-fd38-4b83-80cc-26de0fc81871 –O vmdk ./myvm_Disk1.vmdk –p
-o output format (VMDK)
-p show progress

Sadly the vmdk file that is the result of this convert is not consumable by ESXi just yet.

Get the file somewhere the ESXi server can read it, and use vmkfstools to convert it again.

vmkfstools -i myvm_Disk1.vmdk -d thin myvm-Disk1.vmdk

Now the file can be added to a new vSphere VM.


CpuHotRemoveEnabled ?!

Was playing around enabling CPU & Memory Hot Add via PowerCli/PowerShell, and came across the CPUHotRemoveEnabled feature.

<pre>$VMSpec=New-Object -Type VMware.Vim.VirtualMachineConfigSpec -Property @{"CpuHotRemoveEnabled" =  $true}
$VM = Get-VM W2K16GA
$VM.ExtensionData.ReconfigVM_Task($VMSpec)</pre>

This feature may be around for ages, I personally never used it. And as far as I know is still unsupported.. Tried it with a Windows 2016 Enterprise Edition VM, but no sigar. Both the GUI and PowerCli didn’t allow changes to be made. Could scale up CPUs but unable to scale down.

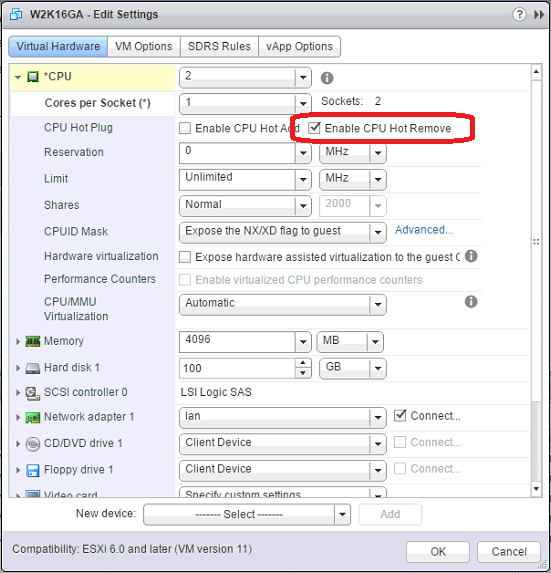
(The screenshot below doesn’t show CPU Hot Plug as Enabled, but CPU Hot Remove fails regardless of CPU Hot Plug being Enabled or not)

PowerCli error:

Set-VM W2K16GA -NumCpu 1
The operation for the entity "W2K16GA" failed with the following message: "CPU hot plug is not supported for this virtual machine."

So don’t know if this post is useful for anybody, but I smiled while playing around with this. 🙂

But if you enable it on a VM in 6.5 you get a prevously hidden check box:

EnableCPUHotRemoveCheckMark

Enable CPU Hot Remove checkbox visible

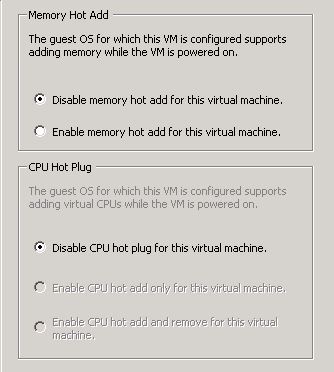
hotplug

The ye olde fatclient also had this option (picture blatenly stolen from somewhere)

VCSA Native Backup Logging

Just a little post about logging.

VMware’s example script logs to backup.log in the directory the script is ran from.

However I just placed the script in /etc/cron.daily/ and it will only log when the script is started by a user. Started by Cron, it doesn’t log to this file.

However there is logging available at:

/storage/log/vmware/applmgmt/backupRestoreAPI.log which contains some condensed information:

2017-03-07 03:49:02,628 [MainProcess:PID-40796] INFO: The location provided: ftps://123.123.123.123/backup/2017-03-07-03-49-02
2017-03-07 03:49:02,814 [MainProcess:PID-40796] INFO: The backup dir does not exist
2017-03-07 03:49:04,993 [MainProcess:PID-40796] INFO: List of stopped services: [u'imagebuilder', u'vmcam', u'mbcs', u'vcha', u'netdumper', u'rbd']
2017-03-07 03:52:58,694 [MainProcess:PID-40796] INFO: Checking whether the backup job completed or not.
2017-03-07 03:52:58,695 [MainProcess:PID-40796] INFO: Backup job completed with the state 'SUCCEEDED'.

and

/storage/log/vmware/applmgmt/backup.log which is much more verbose:

2017-03-07 03:49:05,290 [MainProcess:PID-37567] INFO: The location provided: ftps://123.123.123.123/backup/2017-03-07-03-49-02
2017-03-07 03:49:05,314 [MainProcess:PID-37567] INFO: Starting backup job...
2017-03-07 03:49:08,476 [MainProcess:PID-37567] INFO: The backup dir does not exist
2017-03-07 03:49:08,538 [MainProcess:PID-37567] INFO: Started backup at UTC: 2017-03-07 02:49:08.439122
2017-03-07 03:49:08,546 [ConfigFilesBackup:PID-37615] INFO: Started with configuration files backup.
2017-03-07 03:49:08,546 [LotusBackup:PID-37616] INFO: Starting backup Lotus
2017-03-07 03:49:08,548 [StatsMonitorDBBackup:PID-37619] INFO: Starting backup appliance monitor SQLite DB.
2017-03-07 03:49:08,549 [StatsMonitorDBBackup:PID-37619] INFO: Appliance Stats Monitor database file path: /var/vmware/applmgmt/appliance_stats.sqlite
2017-03-07 03:49:08,549 [StatsMonitorDBBackup:PID-37619] INFO: Executing command sqlite3 /var/vmware/applmgmt/appliance_stats.sqlite .dump.
2017-03-07 03:49:08,550 [LotusBackup:PID-37616] INFO: BackupLotus: Running /usr/lib/vmware-vmdir/bin/vdcbackup /storage/db/vmware-vmdir/ /tmp/backup_lotus/
2017-03-07 03:49:08,552 [VCDBBackup:PID-37617] INFO: Retrieving postgres server listening port
2017-03-07 03:49:08,552 [VCDBBackup:PID-37617] INFO: Executing command: netstat -plnt.
2017-03-07 03:49:08,558 [ComponentScriptsBackup:PID-37618] INFO: Starting backup component: imagebuilder
2017-03-07 03:49:08,559 [ComponentScriptsBackup:PID-37618] INFO: Execute imagebuilder script: /etc/vmware/backup/component-scripts/imagebuilder/backup_restore.py --startBackup
2017-03-07 03:49:08,562 [ComponentScriptsBackup:PID-37618] INFO: Dispatching stream.
2017-03-07 03:49:08,643 [VCDBBackup:PID-37617] INFO: Starting VCDB full database backup
2017-03-07 03:49:08,644 [VCDBBackup:PID-37617] INFO: Executing command: ['/opt/vmware/vpostgres/current/bin/psql', '-U', 'postgres', '-p', '5432', '-At', '-c', u"select pg_xlogfile_name(pg_start_backup('backup_20170307_024905_4944578'));"].
2017-03-07 03:49:08,797 [ConfigFilesBackup:PID-37615] INFO: incl: /var/log/vmware/applmgmt/cfg_incl_3Swc3b.lst excl: /var/log/vmware/applmgmt/cfg_excl_1lUKkw.lst
2017-03-07 03:49:08,798 [ConfigFilesBackup:PID-37615] INFO: tarCmd = tar -cz -C / --ignore-failed-read -T "/var/log/vmware/applmgmt/cfg_incl_3Swc3b.lst" -X "/var/log/vmware/applmgmt/cfg_excl_1lUKkw.lst" --warning="no-file-ignored"
2017-03-07 03:49:08,856 [ComponentScriptsBackup:PID-37618] INFO: Component imagebuilder backup successful.
2017-03-07 03:49:08,857 [ComponentScriptsBackup:PID-37618] INFO: Starting backup component: vum
2017-03-07 03:49:08,858 [ComponentScriptsBackup:PID-37618] INFO: Execute vum script: /etc/vmware/backup/component-scripts/vum/backup_restore.py --startBackup
2017-03-07 03:49:08,861 [ComponentScriptsBackup:PID-37618] INFO: Dispatching stream.
2017-03-07 03:49:10,115 [StatsMonitorDBBackup:PID-37619] INFO: Completed backup appliance stats monitor SQLite DB.
2017-03-07 03:49:17,742 [LotusBackup:PID-37616] INFO: stdout: BackupDB: Setting vmdir state to VMDIRD_READ_ONLY
BackupDB: Backing up: /storage/db/vmware-vmdir//data.mdb
BackupDB: Backing up: /storage/db/vmware-vmdir//lock.mdb
BackupDB: Setting vmdir state to VMDIRD_NORMAL

2017-03-07 03:49:17,742 [LotusBackup:PID-37616] INFO: BackupLotus: Dispatching files ['lock.mdb', 'data.mdb']
2017-03-07 03:49:17,742 [LotusBackup:PID-37616] INFO: tarCmd = tar -cz -C /tmp/backup_lotus/ --ignore-failed-read --warning="no-file-ignored" "lock.mdb" "data.mdb"
2017-03-07 03:49:28,855 [LotusBackup:PID-37616] INFO: Lotus backup finished successfully.
2017-03-07 03:49:28,961 [LotusBackup:PID-37616] INFO: Cleaning up Vmdir. Running /usr/lib/vmware-vmdir/bin/vdcbackup -c
2017-03-07 03:49:29,043 [LotusBackup:PID-37616] INFO: stdout: Cleanup: Setting vmdir state to VMDIRD_NORMAL

2017-03-07 03:49:29,043 [LotusBackup:PID-37616] INFO: Cleaning up Vmdir. Running /usr/lib/vmware-vmdir/bin/vdcbackup -c
2017-03-07 03:49:29,129 [LotusBackup:PID-37616] INFO: stdout: Cleanup: Setting vmdir state to VMDIRD_NORMAL

2017-03-07 03:49:33,757 [VCDBBackup:PID-37617] INFO: Successfully start Postgres on-line backup window.
2017-03-07 03:49:33,757 [VCDBBackup:PID-37617] INFO: Backup start WAL file is 0000000100000003000000FF.
2017-03-07 03:49:33,759 [VCDBBackup:PID-37617] INFO: tarCmd = tar -cz -C / --ignore-failed-read --warning="no-file-ignored" --warning="no-file-changed" --warning="no-file-removed" "storage/db/vpostgres" "storage/seat/vpostgres" "root/.pgpass" "var/log/vmware/vpostgres"
2017-03-07 03:49:33,760 [VCDB-WAL-Backup:PID-37920] INFO: Starting backup WAL files.
2017-03-07 03:49:33,761 [VCDB-WAL-Backup:PID-37920] INFO: VCDB backup start at WAL file 0000000100000003000000FF.
2017-03-07 03:49:33,761 [VCDB-WAL-Backup:PID-37920] INFO: Each WAL backup image contains 5 WAL files.
2017-03-07 03:49:34,762 [VCDB-WAL-Backup:PID-37920] INFO: Executing command: ['/opt/vmware/vpostgres/current/bin/psql', '-U', 'postgres', '-p', '5432', '-At', '-c', 'SELECT pg_xlogfile_name(pg_current_xlog_location());'].
2017-03-07 03:49:35,787 [VCDB-WAL-Backup:PID-37920] INFO: Executing command: ['/opt/vmware/vpostgres/current/bin/psql', '-U', 'postgres', '-p', '5432', '-At', '-c', 'SELECT pg_xlogfile_name(pg_current_xlog_location());'].
2017-03-07 03:49:36,819 [VCDB-WAL-Backup:PID-37920] INFO: Executing command: ['/opt/vmware/vpostgres/current/bin/psql', '-U', 'postgres', '-p', '5432', '-At', '-c', 'SELECT pg_xlogfile_name(pg_current_xlog_location());'].
2017-03-07 03:49:37,864 [VCDB-WAL-Backup:PID-37920] INFO: Executing command: ['/opt/vmware/vpostgres/current/bin/psql', '-U', 'postgres', '-p', '5432', '-At', '-c', 'SELECT pg_xlogfile_name(pg_current_xlog_location());'].
2017-03-07 03:49:38,890 [VCDB-WAL-Backup:PID-37920] INFO: Executing command: ['/opt/vmware/vpostgres/current/bin/psql', '-U', 'postgres', '-p', '5432', '-At', '-c', 'SELECT pg_xlogfile_name(pg_current_xlog_location());'].
2017-03-07 03:49:39,917 [VCDB-WAL-Backup:PID-37920] INFO: Executing command: ['/opt/vmware/vpostgres/current/bin/psql', '-U', 'postgres', '-p', '5432', '-At', '-c', 'SELECT pg_xlogfile_name(pg_current_xlog_location());'].
2017-03-07 03:49:40,941 [VCDB-WAL-Backup:PID-37920] INFO: Executing command: ['/opt/vmware/vpostgres/current/bin/psql', '-U', 'postgres', '-p', '5432', '-At', '-c', 'SELECT pg_xlogfile_name(pg_current_xlog_location());'].
2017-03-07 03:49:41,964 [VCDB-WAL-Backup:PID-37920] INFO: Executing command: ['/opt/vmware/vpostgres/current/bin/psql', '-U', 'postgres', '-p', '5432', '-At', '-c', 'SELECT pg_xlogfile_name(pg_current_xlog_location());'].
2017-03-07 03:49:42,984 [VCDB-WAL-Backup:PID-37920] INFO: Executing command: ['/opt/vmware/vpostgres/current/bin/psql', '-U', 'postgres', '-p', '5432', '-At', '-c', 'SELECT pg_xlogfile_name(pg_current_xlog_location());'].
2017-03-07 03:49:44,003 [VCDB-WAL-Backup:PID-37920] INFO: Executing command: ['/opt/vmware/vpostgres/current/bin/psql', '-U', 'postgres', '-p', '5432', '-At', '-c', 'SELECT pg_xlogfile_name(pg_current_xlog_location());'].
2017-03-07 03:49:45,052 [VCDB-WAL-Backup:PID-37920] INFO: Executing command: ['/opt/vmware/vpostgres/current/bin/psql', '-U', 'postgres', '-p', '5432', '-At', '-c', 'SELECT pg_xlogfile_name(pg_current_xlog_location());'].
2017-03-07 03:49:46,068 [VCDB-WAL-Backup:PID-37920] INFO: Executing command: ['/opt/vmware/vpostgres/current/bin/psql', '-U', 'postgres', '-p', '5432', '-At', '-c', 'SELECT pg_xlogfile_name(pg_current_xlog_location());'].
2017-03-07 03:49:47,088 [VCDB-WAL-Backup:PID-37920] INFO: Executing command: ['/opt/vmware/vpostgres/current/bin/psql', '-U', 'postgres', '-p', '5432', '-At', '-c', 'SELECT pg_xlogfile_name(pg_current_xlog_location());'].
2017-03-07 03:49:48,110 [VCDB-WAL-Backup:PID-37920] INFO: Executing command: ['/opt/vmware/vpostgres/current/bin/psql', '-U', 'postgres', '-p', '5432', '-At', '-c', 'SELECT pg_xlogfile_name(pg_current_xlog_location());'].
2017-03-07 03:49:49,130 [VCDB-WAL-Backup:PID-37920] INFO: Executing command: ['/opt/vmware/vpostgres/current/bin/psql', '-U', 'postgres', '-p', '5432', '-At', '-c', 'SELECT pg_xlogfile_name(pg_current_xlog_location());'].
2017-03-07 03:49:50,153 [VCDB-WAL-Backup:PID-37920] INFO: Executing command: ['/opt/vmware/vpostgres/current/bin/psql', '-U', 'postgres', '-p', '5432', '-At', '-c', 'SELECT pg_xlogfile_name(pg_current_xlog_location());'].
2017-03-07 03:49:51,172 [VCDB-WAL-Backup:PID-37920] INFO: Executing command: ['/opt/vmware/vpostgres/current/bin/psql', '-U', 'postgres', '-p', '5432', '-At', '-c', 'SELECT pg_xlogfile_name(pg_current_xlog_location());'].
2017-03-07 03:49:52,194 [VCDB-WAL-Backup:PID-37920] INFO: Executing command: ['/opt/vmware/vpostgres/current/bin/psql', '-U', 'postgres', '-p', '5432', '-At', '-c', 'SELECT pg_xlogfile_name(pg_current_xlog_location());'].
2017-03-07 03:49:53,233 [VCDB-WAL-Backup:PID-37920] INFO: Executing command: ['/opt/vmware/vpostgres/current/bin/psql', '-U', 'postgres', '-p', '5432', '-At', '-c', 'SELECT pg_xlogfile_name(pg_current_xlog_location());'].
2017-03-07 03:49:54,262 [VCDB-WAL-Backup:PID-37920] INFO: Executing command: ['/opt/vmware/vpostgres/current/bin/psql', '-U', 'postgres', '-p', '5432', '-At', '-c', 'SELECT pg_xlogfile_name(pg_current_xlog_location());'].
2017-03-07 03:49:55,276 [VCDB-WAL-Backup:PID-37920] INFO: Executing command: ['/opt/vmware/vpostgres/current/bin/psql', '-U', 'postgres', '-p', '5432', '-At', '-c', 'SELECT pg_xlogfile_name(pg_current_xlog_location());'].
2017-03-07 03:49:56,293 [VCDB-WAL-Backup:PID-37920] INFO: Executing command: ['/opt/vmware/vpostgres/current/bin/psql', '-U', 'postgres', '-p', '5432', '-At', '-c', 'SELECT pg_xlogfile_name(pg_current_xlog_location());'].
2017-03-07 03:49:57,331 [VCDB-WAL-Backup:PID-37920] INFO: Executing command: ['/opt/vmware/vpostgres/current/bin/psql', '-U', 'postgres', '-p', '5432', '-At', '-c', 'SELECT pg_xlogfile_name(pg_current_xlog_location());'].
2017-03-07 03:49:58,347 [VCDB-WAL-Backup:PID-37920] INFO: Executing command: ['/opt/vmware/vpostgres/current/bin/psql', '-U', 'postgres', '-p', '5432', '-At', '-c', 'SELECT pg_xlogfile_name(pg_current_xlog_location());'].
2017-03-07 03:49:59,399 [VCDB-WAL-Backup:PID-37920] INFO: Executing command: ['/opt/vmware/vpostgres/current/bin/psql', '-U', 'postgres', '-p', '5432', '-At', '-c', 'SELECT pg_xlogfile_name(pg_current_xlog_location());'].
2017-03-07 03:50:00,416 [VCDB-WAL-Backup:PID-37920] INFO: Executing command: ['/opt/vmware/vpostgres/current/bin/psql', '-U', 'postgres', '-p', '5432', '-At', '-c', 'SELECT pg_xlogfile_name(pg_current_xlog_location());'].
2017-03-07 03:50:01,439 [VCDB-WAL-Backup:PID-37920] INFO: Executing command: ['/opt/vmware/vpostgres/current/bin/psql', '-U', 'postgres', '-p', '5432', '-At', '-c', 'SELECT pg_xlogfile_name(pg_current_xlog_location());'].
2017-03-07 03:50:02,478 [VCDB-WAL-Backup:PID-37920] INFO: Executing command: ['/opt/vmware/vpostgres/current/bin/psql', '-U', 'postgres', '-p', '5432', '-At', '-c', 'SELECT pg_xlogfile_name(pg_current_xlog_location());'].
2017-03-07 03:50:03,508 [VCDB-WAL-Backup:PID-37920] INFO: Executing command: ['/opt/vmware/vpostgres/current/bin/psql', '-U', 'postgres', '-p', '5432', '-At', '-c', 'SELECT pg_xlogfile_name(pg_current_xlog_location());'].
2017-03-07 03:50:04,524 [VCDB-WAL-Backup:PID-37920] INFO: Executing command: ['/opt/vmware/vpostgres/current/bin/psql', '-U', 'postgres', '-p', '5432', '-At', '-c', 'SELECT pg_xlogfile_name(pg_current_xlog_location());'].
2017-03-07 03:50:05,548 [VCDB-WAL-Backup:PID-37920] INFO: Executing command: ['/opt/vmware/vpostgres/current/bin/psql', '-U', 'postgres', '-p', '5432', '-At', '-c', 'SELECT pg_xlogfile_name(pg_current_xlog_location());'].
2017-03-07 03:50:06,564 [VCDB-WAL-Backup:PID-37920] INFO: Executing command: ['/opt/vmware/vpostgres/current/bin/psql', '-U', 'postgres', '-p', '5432', '-At', '-c', 'SELECT pg_xlogfile_name(pg_current_xlog_location());'].
2017-03-07 03:50:07,597 [VCDB-WAL-Backup:PID-37920] INFO: Executing command: ['/opt/vmware/vpostgres/current/bin/psql', '-U', 'postgres', '-p', '5432', '-At', '-c', 'SELECT pg_xlogfile_name(pg_current_xlog_location());'].
2017-03-07 03:50:08,616 [VCDB-WAL-Backup:PID-37920] INFO: Executing command: ['/opt/vmware/vpostgres/current/bin/psql', '-U', 'postgres', '-p', '5432', '-At', '-c', 'SELECT pg_xlogfile_name(pg_current_xlog_location());'].
2017-03-07 03:50:09,643 [VCDB-WAL-Backup:PID-37920] INFO: Executing command: ['/opt/vmware/vpostgres/current/bin/psql', '-U', 'postgres', '-p', '5432', '-At', '-c', 'SELECT pg_xlogfile_name(pg_current_xlog_location());'].
2017-03-07 03:50:10,658 [VCDB-WAL-Backup:PID-37920] INFO: Executing command: ['/opt/vmware/vpostgres/current/bin/psql', '-U', 'postgres', '-p', '5432', '-At', '-c', 'SELECT pg_xlogfile_name(pg_current_xlog_location());'].
2017-03-07 03:50:11,699 [VCDB-WAL-Backup:PID-37920] INFO: Executing command: ['/opt/vmware/vpostgres/current/bin/psql', '-U', 'postgres', '-p', '5432', '-At', '-c', 'SELECT pg_xlogfile_name(pg_current_xlog_location());'].
2017-03-07 03:50:12,720 [VCDB-WAL-Backup:PID-37920] INFO: Executing command: ['/opt/vmware/vpostgres/current/bin/psql', '-U', 'postgres', '-p', '5432', '-At', '-c', 'SELECT pg_xlogfile_name(pg_current_xlog_location());'].
2017-03-07 03:50:13,740 [VCDB-WAL-Backup:PID-37920] INFO: Executing command: ['/opt/vmware/vpostgres/current/bin/psql', '-U', 'postgres', '-p', '5432', '-At', '-c', 'SELECT pg_xlogfile_name(pg_current_xlog_location());'].
2017-03-07 03:50:14,762 [VCDB-WAL-Backup:PID-37920] INFO: Executing command: ['/opt/vmware/vpostgres/current/bin/psql', '-U', 'postgres', '-p', '5432', '-At', '-c', 'SELECT pg_xlogfile_name(pg_current_xlog_location());'].
2017-03-07 03:50:15,788 [VCDB-WAL-Backup:PID-37920] INFO: Executing command: ['/opt/vmware/vpostgres/current/bin/psql', '-U', 'postgres', '-p', '5432', '-At', '-c', 'SELECT pg_xlogfile_name(pg_current_xlog_location());'].
2017-03-07 03:50:16,822 [VCDB-WAL-Backup:PID-37920] INFO: Executing command: ['/opt/vmware/vpostgres/current/bin/psql', '-U', 'postgres', '-p', '5432', '-At', '-c', 'SELECT pg_xlogfile_name(pg_current_xlog_location());'].
2017-03-07 03:50:17,836 [VCDB-WAL-Backup:PID-37920] INFO: Executing command: ['/opt/vmware/vpostgres/current/bin/psql', '-U', 'postgres', '-p', '5432', '-At', '-c', 'SELECT pg_xlogfile_name(pg_current_xlog_location());'].
2017-03-07 03:50:18,853 [VCDB-WAL-Backup:PID-37920] INFO: Executing command: ['/opt/vmware/vpostgres/current/bin/psql', '-U', 'postgres', '-p', '5432', '-At', '-c', 'SELECT pg_xlogfile_name(pg_current_xlog_location());'].
2017-03-07 03:50:19,905 [VCDB-WAL-Backup:PID-37920] INFO: Executing command: ['/opt/vmware/vpostgres/current/bin/psql', '-U', 'postgres', '-p', '5432', '-At', '-c', 'SELECT pg_xlogfile_name(pg_current_xlog_location());'].
2017-03-07 03:50:20,574 [VCDBBackup:PID-37617] INFO: tarCmd = tar -cz -C / --ignore-failed-read --no-recursion --warning="no-file-ignored" "storage/dblog/vpostgres/pg_xlog" "storage/dblog/vpostgres/pg_xlog/archive_status"
2017-03-07 03:50:20,675 [VCDBBackup:PID-37617] INFO: Stopping Postgres full database backup.
2017-03-07 03:50:20,675 [VCDBBackup:PID-37617] INFO: Executing command: ['/opt/vmware/vpostgres/current/bin/psql', '-U', 'postgres', '-p', '5432', '-At', '-c', 'select pg_xlogfile_name(pg_stop_backup());'].
2017-03-07 03:50:20,940 [VCDB-WAL-Backup:PID-37920] INFO: VCDB backup stop at WAL file 0000000100000003000000FF.
2017-03-07 03:50:20,941 [VCDB-WAL-Backup:PID-37920] INFO: Dispatching 1 WAL files into backup archive: wal_backup_1.tar.gz.enc
2017-03-07 03:50:20,943 [VCDB-WAL-Backup:PID-37920] INFO: tarCmd = tar -cz -C / --ignore-failed-read -T "/var/log/vmware/applmgmt/wal_files_s0gPyD.lst" --warning="no-file-ignored" --warning="no-file-changed" --warning="no-file-removed"
2017-03-07 03:50:21,290 [VCDB-WAL-Backup:PID-37920] INFO: No WAL files got rotated during backup.
2017-03-07 03:50:21,290 [VCDB-WAL-Backup:PID-37920] INFO: WAL files from 0000000100000003000000FF to 0000000100000003000000FF were backed up into wal_backup_1.tar.gz.enc successfully.
2017-03-07 03:50:21,290 [VCDB-WAL-Backup:PID-37920] INFO: tarCmd = tar -cz -C / --ignore-failed-read --warning="no-file-ignored" "dev/shm/all_wal_meta.json"
2017-03-07 03:50:21,422 [VCDB-WAL-Backup:PID-37920] INFO: Verifying all new WAL were backed up.
2017-03-07 03:50:21,422 [VCDB-WAL-Backup:PID-37920] INFO: Completed backup all 1 WAL files from (VCDB backup start)0000000100000003000000FF to (VCDB backup stop)0000000100000003000000FF.
2017-03-07 03:50:21,423 [VCDBBackup:PID-37617] INFO: WAL backup process completed successfully.
2017-03-07 03:50:21,424 [VCDBBackup:PID-37617] INFO: WAL backup process exited.
2017-03-07 03:50:21,425 [VCDBBackup:PID-37617] INFO: Finishing full database backup
2017-03-07 03:50:21,426 [VCDBBackup:PID-37617] INFO: Retrieving postgres server listening port
2017-03-07 03:50:21,426 [VCDBBackup:PID-37617] INFO: Executing command: netstat -plnt.
2017-03-07 03:50:21,458 [VCDBBackup:PID-37617] INFO: Canceling running pg_start_backup() process.
2017-03-07 03:50:21,458 [VCDBBackup:PID-37617] INFO: Executing command: ['/opt/vmware/vpostgres/current/bin/psql', '-U', 'postgres', '-p', '5432', '-At', '-c', "SELECT pg_cancel_backend(pid) FROM pg_stat_activity WHERE query ~ '^pg_start_backup'"].
2017-03-07 03:50:21,478 [VCDBBackup:PID-37617] INFO: No pg_start_backup() process is running.
2017-03-07 03:50:21,478 [VCDBBackup:PID-37617] INFO: Checking whether Postgres online backup still in progress
2017-03-07 03:50:21,478 [VCDBBackup:PID-37617] INFO: Executing command: /opt/vmware/vpostgres/current/bin/psql -U postgres -p 5432 -t -c "select pg_is_in_backup();".
2017-03-07 03:50:21,495 [VCDBBackup:PID-37617] INFO: Postgres on-line backup already finished. Skip stopping backup operation
2017-03-07 03:50:21,496 [VCDBBackup:PID-37617] INFO: Successfully cleaned up for VCDB backup.
2017-03-07 03:52:23,502 [ComponentScriptsBackup:PID-37618] INFO: Component vum backup successful.
2017-03-07 03:52:23,503 [ComponentScriptsBackup:PID-37618] INFO: Starting backup component: rbd
2017-03-07 03:52:23,504 [ComponentScriptsBackup:PID-37618] INFO: Execute rbd script: /etc/vmware/backup/component-scripts/rbd/rbd-backup-restore --startBackup
2017-03-07 03:52:23,507 [ComponentScriptsBackup:PID-37618] INFO: Dispatching stream.
2017-03-07 03:52:23,642 [ComponentScriptsBackup:PID-37618] INFO: Component rbd backup successful.
2017-03-07 03:52:58,009 [ConfigFilesBackup:PID-37615] ERROR: rc: 0, stderr: tar: usr/lib/vmware-vpx/endpoints/vimapi-endpoint.xml: Warning: Cannot stat: No such file or directory
tar: etc/vmware-vsm/wrapper/wrapper_java_additional.conf: Warning: Cannot stat: No such file or directory
tar: var/lib/vmware/vmcam/ssl/certs: Warning: Cannot stat: No such file or directory
tar: etc/vmware-eam/version: Warning: Cannot stat: No such file or directory
tar: usr/lib/vmware-vpx/sps/wrapper/conf/wrapper_java_additional.conf: Warning: Cannot stat: No such file or directory
tar: usr/etc/systemd/user: Warning: Cannot stat: No such file or directory
tar: storage/db/vmware-vmdir/snapshot: Warning: Cannot stat: No such file or directory
tar: usr/lib/vmware-vcha/data/pg_hba_block.conf: Warning: Cannot stat: No such file or directory
tar: usr/lib/vmware-vmafd/share/config/krb5.keytab: Warning: Cannot stat: No such file or directory
tar: usr/lib/vmware-vcha/data/pg-firewall-block.conf: Warning: Cannot stat: No such file or directory
tar: usr/lib/vmware-vpx/endpoints/qs-endpoint.xml: Warning: Cannot stat: No such file or directory
tar: etc/vmware/appliance/firewall/ccm-firewall.conf: Warning: Cannot stat: No such file or directory

2017-03-07 03:52:58,010 [ConfigFilesBackup:PID-37615] INFO: Successfully finished configuration files backup.
2017-03-07 03:52:58,481 [MainProcess:PID-37567] INFO: PNID 'knvcenter.local.raadvanstate.nl' is resolved with addrInfo: [(2, 1, 6, '', ('234.234.234.234', 0)), (2, 2, 17, '', ('234.234.234.234', 0)), (2, 3, 0, '', ('234.234.234.234', 0))]
2017-03-07 03:52:58,482 [MainProcess:PID-37567] INFO: Generating password validator in metadata.
2017-03-07 03:52:58,482 [MainProcess:PID-37567] INFO: Executing command: ['openssl', 'aes-256-cbc', '-e', '-k', '****', '-base64'].
2017-03-07 03:52:58,488 [MainProcess:PID-37567] INFO: Password validator: Uadsf%$dGVkdasf5d5adsfv4aL2E97IHnNq45agaxadsfUJs9A9AoEFlb4LeA2U
sYWWH3+DUOwlazxvi58mpydsVihL5AQAkgiO8jKWfFg=
2017-03-07 03:52:58,488 [MainProcess:PID-37567] INFO: The location provided: ftps://123.123.123.123/backup/2017-03-07-03-49-02
2017-03-07 03:52:58,671 [MainProcess:PID-37567] ERROR: Failed to make the files readonly at ftp://123.123.123.123/backup/2017-03-07-03-49-02/; Err- Failed to execute command '['curl', '--fail', '-u', u'ftpuser@local.domain:****', '--connect-timeout', '10', '--ssl-reqd', '-k', '--silent', '--show-error', '-Q', u'SITE chmod 444 backup/2017-03-07-03-49-02/backup-metadata.json', u'ftp://123.123.123.123/']' at 'ftp://123.123.123.123/'; ret=21
stdOut:
stdErr: curl: (21) QUOT command failed with 500

2017-03-07 03:52:58,672 [MainProcess:PID-37567] INFO: Finished backup at UTC: 2017-03-07 02:52:58.671633. Duration: 230 seconds.
2017-03-07 03:52:58,678 [MainProcess:PID-37567] INFO: Backup job finished successfully.


The message:

tar: etc/vmware-eam/version: Warning: Cannot stat: No such file or directory

seam to be safe to ignore. Saw these on multiple VCSA servers. (Same version 6.5A (build 5200)

Same goes for this message:

ERROR: Failed to make the files readonly at ftp://123.123.123.123/backup/2017-03-07-03-49-02/

Since the FTP server is a Windows (IIS) server, it does not support chmod. On my homelab (using a Synology NAS as FTP server) this message doesn’t show.


Setting up FTPS server for VCSA backup

I followed the steps in Backing up vCSA 6.5 natively using FTPS but wasn’t able to create a backup succesfully.

It seemed that I could login to the ftps server with FileZilla client, but it wasn’t able to list the directories on the FTPS server. Didn’t really noticed the warnings in FileZilla, since the directories were empty 🙂

However FileZilla complained:

Status: Connecting to 1.2.3.4:21...
Status: Connection established, waiting for welcome message...
Status: Initializing TLS...
Status: Verifying certificate...
Status: TLS connection established.
Status: Logged in
Status: Retrieving directory listing...
Command: PWD
Response: 257 "/" is current directory.
Command: TYPE I
Response: 200 Type set to I.
Command: PASV
Response: 227 Entering Passive Mode (1,2,3,4,208,227).
Command: LIST
Response: 150 Opening BINARY mode data connection.
Error: Connection timed out
Error: Failed to retrieve directory listing
Status: Disconnected from server

Grant Curell blogged about this error (look for Fixing Problem #2 on the blog) the issue was with the internal Windows firewall in Windows 2012 R2.

Also Using the buildin (Predefined) FTP Server rules didn’t work:

PredefinedFTPServerRule

Not working Build-In Predefined FTP Server rule

I’ve created two firewall rules, allowing ports 20,21,990, 55000-56000 in both UDP and TCP.

CustomFTPrule

Two of these Port rules, One for TCP one for UDP.

I set the Data Channel Port Range from 55000 to 56000. This setting is done on the IIS node, not on the FTP site.

DataChannelPortRange

Data Channel Port Range setting (entire IIS server, not just the FTP site)

After a restart of the FTP server service, I could now connect. And the backup now finishes succesfully.

Status: Connecting to 1.2.3.4:21...
Status: Connection established, waiting for welcome message...
Status: Initializing TLS...
Status: Verifying certificate...
Status: TLS connection established.
Status: Logged in
Status: Retrieving directory listing...
Status: Directory listing of "/" successful